Develop Dash Apps
 | Abbreviations Key |
| HISE | Human Immune System Explorer |
| IDE | integrated development environment |
| IGV | integrative genomics viewer |
| SDK | software development kit |
Dash is a wonderful library framework, all in Python, that lets you build interactive web application dashboards. Through a couple of simple patterns, Dash abstracts away all of the technologies and protocols that are required to build a full-stack web app with interactive data visualization. Dash is simple enough that you can bind a user interface to your code efficiently.
We will go over outlined steps that you should follow when you have a finished dash app they want uploaded and publicized. There are 2 steps we want you to separate out: the processing step, and the visualization step. The processing step should contain code that reads in data from HISE and does any transformations to the original dataset(s). Once you derive important results, we recommend saving your results to a study by using uploadFiles(). That way, there will be an entire trace from downloading data to visualizing results and your findings are easily reproducible. Lastly, the visualization step should simply handle visualizing the data by utilizing input data that came directly from your processing step.
Here is a high-level overview of the recommended workflow when developing a Plotly Dash app:
Instructions
 Create a Study
The first step recommended when developing dash applications is to create a study. The study created will be the home for all versions of your dash application.
1. Navigate to HISE, and use your organizational email address to sign in.
2. From the top navigation menu, select COLLABORATION SPACE.

3. In the upper-right corner, click New Study.

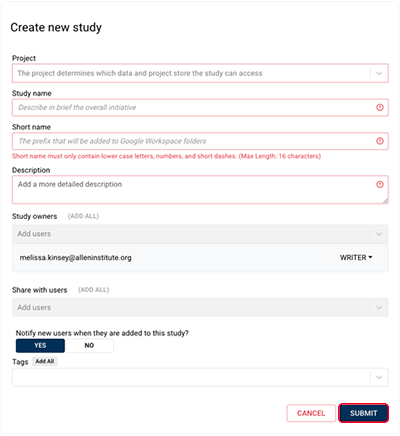
4. In the Create new study dialog box, complete the requested information, . For details, see Work with Studies (Tutorial).

 Create a File Set
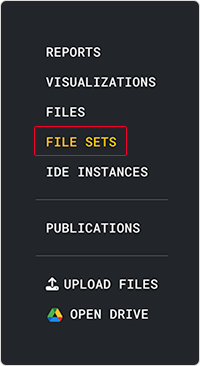
1. Create a file set. For details, follow the instructions in Step 1 of Work with File Sets (Tutorial).

There are two main scenarios where we suggest creating a file set when dealing with dash applications:
- If you want to publish your notebook that handles the processing step, then you should save the input files as a file set. This isn't required, but is a good practice. This will also allow any other users to easily trace back to the original data source.
- If you want to share the output files from your processing step, then you should also save the output as a file set. Doing so will allow other users to skip the processing step and start building any visualizations or other tools.
 Process Data
This step should contain code or a notebook that reads in data and does any heavy computations or various transformations to the input dataset. Any code that generates a dash app should be omitted from this step. Please refer to this notebook, where we perform some data processing that's later used in the visualization step.
Note: Even though we don't use file sets as an input for this step, it's still recommended to create a file set. If your notebook goes public, you will need to remove any HISE functions. And you will instead, download your file set and load in that file when utilizing your notebook.
 Upload Files
This step should take care of uploading any derived results. Ideally, the uploaded file should be used as input for your app or the visualization step. Not only do you want to upload your files to a study, but this step also requires you to save your files somewhere within the root directory of your app.py file. For more information on how to save your dash app, please see documentation on the save_dash_app() SDK method
 Visualize Data
This is where we finally start developing your dash app. This step is where you create an app.py script that contains all the code that generates your app. Ideally any processing that takes up a significant amount of time shouldn't be included in your app. Of course there are exceptions to this rule. To help you develop your app, we have some example notebooks that may prove useful.
Develop Dash Apps
You must use the JupyterDash library to generate their app in Jupyterlab when developing your dash app in an IDE. JupyterDash makes it easy to build Dash apps from Jupyter environments. In this section, we'll look closely at what import commands allow us to do this and how to properly set up our app.
To see an example of a dash app developed in a notebook, please refer to this notebook.
The following are lines you want to make sure to import from JupyterDash, which are the first five lines in the "Develop Dash App" section of the above notebook:
# Dash for Jupyter + setting up proxy
from jupyter_dash.comms import _send_jupyter_config_comm_request # jupyter-only
_send_jupyter_config_comm_request() # jupyter-only
from jupyter_dash import JupyterDash # jupyter-only
JupyterDash.infer_jupyter_proxy_config() # jupyter-only
The first two lines that deal with _send_jupyter_config_comm_request makes it so it's possible to communicate with the jupyter_dash notebook. And the last four help oute the application through the proxy.
When setting up your app, we typically have the following line near the top of our script: app = dash.Dash(__name__). When developing within the HISE IDE, we want to replace the dash.Dash with JupyterDash. For example, app = JupyterDash(__name__).
The last two lines of code that we need to worry about are the last two lines of our dash app script.
del app.config._read_only["requests_pathname_prefix"] # jupyter only
app.run_server(mode="inline", debug=True)
The first deals with an implementation exploit of JupyterDash that's currently being fixed. See this posted issue for more information: https://github.com/plotly/jupyter-dash/issues/75
The second line is where we finally generate our app. When calling app.run_server(), you have the option to generate the app inline by setting mode='inline', or by opening a new tab by setting mode='JupyterLab'.
Publishing Clean Up
Before you are ready to call save_dash_app(), we strongly recommend that you clean up your working directory and remove any unused scripts or data from their working directory. When you make a save_dash_app() call, a UI will pop up and prompt you to select the files that are truly a part of their app. By default, we'll list everything in your working directory, including subdirectories and their files. So by cleaning up your working directory, you'll make the selection process go much smoother.
The following is a checklist to help you clean up your working directory:
app.py includes script that generates Dash app
any additional scripts that are a part of your app
a single .png image in your working directory
styling sheets saved somewhere in /assets
replace or remove all code from jupyter dash library
 Save Dash App
In this section, we'll go over how to utilize save_dash_app. Currently this method is only supported in Python and doesn't have a R equivalent method. When you're ready to save your dash app, make sure the script that actually generates your app is named "app.py".
To save your dash app to a study, you will want to utilize hisepy’s SDK function: save_dash_app(). one of our customized widgets - SaveDashWidget. To use, just run the following in a cell-block: save_result = SaveDashAppWidget().
To see an example of a dash app developed in a notebook, please refer to this notebook.
dashbio.IGV
In order to generate an IGV component we will be utilizing the dash-bio package. Please refer to this link for more information.
There is a list of pre-defined genomes hosted by IGV that you can choose from by specifying the genome parameter. You can also add a reference dictionary which can be used to specify the genomic data added to the IGV component, and add tracks to display features such as annotations, genome variants, alignments, and quantitative data.
For more information on reference options, visit the IGV wiki.
A data URL/URI is expected when adding your own tracks via the tracks parameter. So a file path would not suffice to get your own track added. Luckily, Dash is built on top of Flask. In the following sections, we will go over how to leverage the Flask server in order to serve the data. Please refer to this link for more information regarding the tracks parameter.
Flask Server
Like other packages developed in Python, Plotly Dash extends Flask. Flask is a micro web framework written in Python. After initializing the Dash class with app = dash.Dash(), we can get the Flask server that's being used by calling app.server. And we then utilize this flask server to serve our files instead of using a separate data server.
The next three sections cover topics related to the following three lines of code:
@server.route("/igv/<path:fname>".format(app.config.url_base_pathname))
def send_file(fname):
return send_from_directory('/home/jupyter/igv/',fname)
Routes Decorator
We are able to decorate a function to register it with a given URL rule. So any time we visit /home/jupyter/igv/<filename>, we trigger this send_file() function which calls send_from_directory().
Proxy URL
Regarding the decorator, you might notice we add app.config.url_base_pathname as a prefix to our endpoint. If you develop a dash app locally or in a HISE IDE, you might notice that this environment variable is None.
When you want to save your dash app via hp.save_dash_app(), under the hood we create a proxy URL and set this URL for the URL_BASE_PATHNAME environment variable. So it doesn't suffice to just pass in the filepath of the files you want to serve, but you will also need to add this environment variable as a prefix.
If all your files are saved in /home/jupyter/igv, then no changes need to be applied to these 3 lines of code.
flask.send_from_directory
When looking at the following code snippet, you will see we make a call to Flasks' send_from_directory() function:
@server.route("{}home/jupyter/igv/<path:fname>".format(app.config.url_base_pathname))
def send_file(fname):
return send_from_directory('/home/jupyter/igv/',fname)
This function is a secure way to serve files from a folder such as static files, or in our case, .bw files. It will return a response that contains the contents of the file you specified. This function has some safety checks built in to make sure the path from the client is not maliciously crafted to point outside, and is recommended to use over flask.send_file().
The way these 3 lines of code are structured, you won't need to change these 3 lines of code (assuming everything you want served is saved in /home/jupyter/igv). If you wanted to add multiple tracks to your IGV component, you would just add another dictionary to the tracks parameter. So make sure to paste those 3 lines of code, and you should be able to add as many tracks as your heart desires!

 Related Resources