Use NextGen IDE Instances (Tutorial)
 | Abbreviations Key |
| CPU | central processing unit |
| GB | gigabytes |
| HISE | Human Immune System Explorer |
| IDE | integrated development environment |
| VM | virtual machine |
At a Glance
This document outlines how to manage version control, data persistence, and sharing within HISE NextGen IDEs.
 Create an IDE
When you create an IDE, you specify your preferred data modality, memory resources, and input files. These parameters determine the data capacity and format of your IDE. For details, see Create Your First NextGen IDE Instance (Tutorial).
 Save a Notebook
When you download your initial input files to an IDE, you choose the type of notebook, console, or file that suits your research purposes. Then the appropriate libraries and packages load automatically.
Instructions
1. From the Launcher tab in the Notebook section, click Python or R 4.
2. Click File > Save Notebook As, and enter the name of your notebook. The new file is automatically stored in a private folder (one folder per user per account) that's backed up to the cloud and version controlled with Git. You can find the private folder in the left navigation panel.
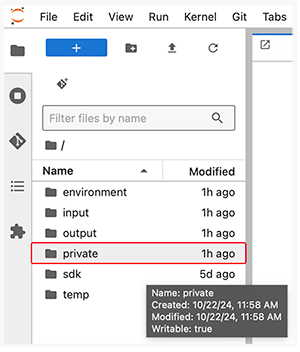
Notebooks are saved to this location by default

 Stop an Instance
After each use of your IDE, upload all critical results to HISE, your private folder, or the Project Store, and then stop the instance. Nothing is saved in memory after the instance is stopped.
Instructions
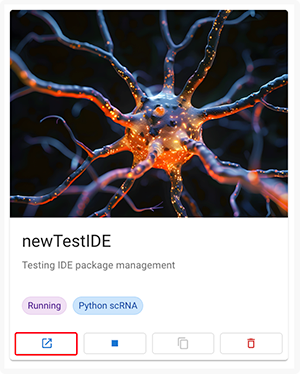
On the IDE NextGen screen, find the card for the IDE you want to stop, and click the square icon at the bottom.

 Reopen or Restart an Instance
At the end of each workday, save your work and stop your instance, as explained in the preceding section. Reopen the instance when you're ready to work on the data again. Be aware, however, that inactive instances do consume cloud resources and might not remain available after a period of inactivity. Check your institution's policy regarding periodic deletion of inactive instances. (For details, see the Monitor Status and Billing section on this page.)
Instructions
1. To reopen a stopped IDE instance, sign in to HISE.
2. Navigate to the IDE NextGen page.
3. (Optional) Use the Sort By filter to help locate your instance. For example, choose Instance Status to group all Stopped instances together.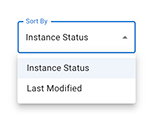
4. When you find your instance, click the corresponding card reopen it. The Stopped tag changes to Starting.

An authentication and authorization check is performed, and then your IDE and workspace are restored to their previous state. When the IDE is active again and ready for use, the status changes to Running.
5. To find your notebook in the list of recent files, click File > Open Recent.

 Delete an Instance
Deleting your instance makes the data nonrecoverable. Do this only if you’re certain you no longer need the notebooks in your IDE or have saved them elsewhere.
Instructions
1. On the IDE NextGen screen, find the card for the IDE you want to delete.
2. Click the garbage can icon in the lower-right corner.

 Clone an Instance
To reproduce your findings or use your IDE as a starting point for further exploration, any authorized HISE user can clone your IDE instance.Cloning your IDE copies the input data, code, and image details. This clone feature is available when you upload a shared result or visualization to a study.
Instructions
1. Navigate to HISE, and use your organizational email address to sign in.
2. From the top navigation menu, click COLLABORATION SPACE.

3. On the Your Studies screen, click the card for the study you want to work with.
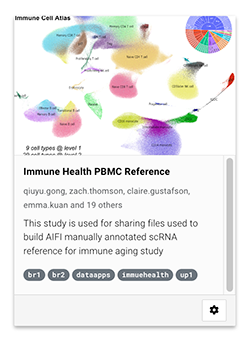
4. In the side navigation menu, click IDE INSTANCES.
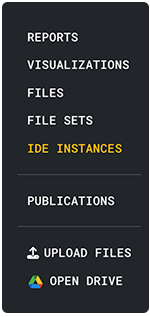
5. Choose the IDE you want to clone.

6. Click the clone icon.
![]()
7. In the dialog box, click CLONE IDE.

 Manage Version Control
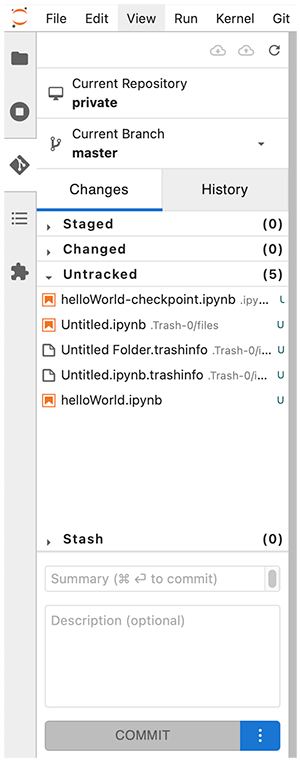
When you create and start an IDE, it's automatically cloned to GitHub, and a dev and prod branch are created. Notebooks and scripts within the IDE are automatically committed to the prod branch on a regular schedule, but you can also use pull requests to ask collaborators to review your work.
Instructions
1. Sign in to HISE.
2. From the top navigation menu, click RESEARCH > IDE NextGen.
3. Find the card for the IDE you want to open.
4. In the lower-left corner, click the Open icon.

5. In the side navigation menu, click the GitHub icon.
![]()
6. This action opens your repo, where you can see, commit, and push changes or use any other Git command.
 Monitor Status and Billing
To check the status of your IDE on the IDE NextGen screen, find the card for your IDE, and click the tag in the lower-left corner. This action opens a screen that confirms the status of your instance, displays the specs you chose when you created the instance, and shows the estimated monthly cost of running the instance. The accompanying screenshot, for example, confirms that the instance is active (Running), indicates that the VM has 500 GB of cloud storage (the private folder) and 14 GB of memory running on 4 CPU cores, and gives a monthly cost estimate of $138.70. Other possible status tags include Creating, Starting, Stopping, and Stopped. Visit the Billing section in HISE to see if you're in danger of exceeding your individual or team monthly cloud spending quota. For details, see Track Your IDE Billing Expenses (Tutorial). 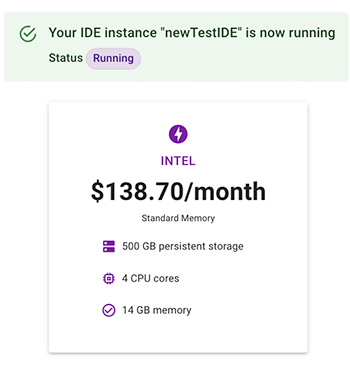
 Related Resources
Track IDE Billing Expenses (Tutorial)
Create Your First NextGen IDE Instance (Tutorial)
Open a Workspace to Re-Execute a Certificate of Reproducibility (Tutorial)
