Ingest Data into the Project Store (Tutorial)
Last updated 2026-06-26At a Glance
Each project in the Human Immune System Explorer (HISE) has a Project Store where all project users can store analyses and upload data that's not associated with an automated pipeline. If you're using a tar file to ingest data, it's important to include a manifest that links these files with specific cohorts, subjects, and samples. Users can then locate the files in an advanced search, and they become traceable in a certificate of reproducibility. To send data to your Project Store, a HISE administrator must set up a designated watchfolder. To submit a request for watchfolder setup or modification, contact Support.
You can now include a batchId column in your manifest.csv to assign batch IDs automatically at ingest time, eliminating the need to tag files manually through the Project Store UI after upload. For details, see Step 1.1.c in the Instructions section below.
Description
The Project Store is a read-only space where multiple users can upload data, mark files for deletion, and store insights in HISE. Data analysts use the Project Store UI to browse files and to save or locate certain project files, such as JPG and PDF files. Each project has its own Project Store, which means that the files in a given Project Store correspond to the specified project.
You can upload files to the Project Store. If the Project Store has a designated watchfolder, drop your files there to ingest the data into HISE. If there is no designated watchfolder, the name of any file you drop into one of the project's other watchfolders must conform to the selected file type. For details see Use Watchfolders to Ingest Data.
Data does not persist in a watchfolder. Instead, it triggers a storage folder to upload and save the data. The files are then housed in your Project Store, where anyone with access can download them. You can also associate metadata with files you've already ingested. Doing so is a best practice to help study collaborators find and access your analysis and results.
Instructions
Ingesting files into your Project Store is a three-step process: create a manifest to tie your files to specific samples, tar up the manifest and sample files for ingestion, and upload the tar file into the designated watchfolder. For details, follow the instructions below.
 Create the manifest file
Create a
manifest.csvfile declaring the file type and sample reference(s) for each file. (See the NOTE below.) Use the .csv file in the following table as an example.
NOTE
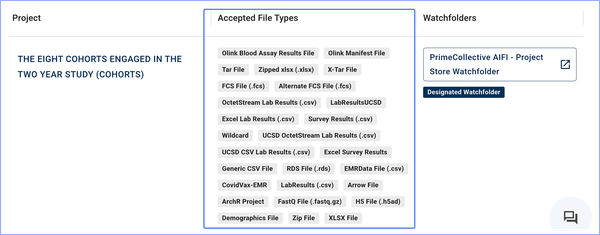
To see which fileType values are valid for your project, check the AcceptedFile Types column in the Project Store ([Your Initials] > Project Store).
If the file type you want to use doesn’t appear in that list, contact Support to request that the new file type be added to your project.
Use the .csv files in the following tabbed table as examples.
a. The accountGuid and projectGuid link your data to the right account and project.
b. If you have a simplified electronic lab notebook (ELN) experiment, SLIMS [simplified laboratory information management system) can automatically generate a manifest.csv that contains the accountGuid and projectGuid. For details, see Attach Metadata to Make Files Searchable (Tutorial).
c. (Optional) To assign a batch ID to your files at ingest, include a batchId column in your manifest. Valid batch IDs are sourced from SLIMS. To see available batch IDs for your project, contact Support
or check with your SLIMS administrator. New batch IDs may take up to 10 minutes to become available after they’re created in SLIMS.
NOTE
In any manifest, accountGuid and projectGuid are optional. If you do include them, the values must be filled in. Leaving the cells blank creates a critical error.
Ingesting files from multiple batches at the same time
If your tar file contains files from more than one batch, you can specify a different batchId for each file by adding a batchId column. When a batchId value is present, it overrides any default batch assignment for that file.
accountGuid | 16309200-3228-46eb-9a8e-3a4133f4d723 | NA | NA |
projectGuid | e206cf7a-5b13-478f-b842-a305fe4954d8 | NA | NA |
file | samples | fileType | batchId |
|---|---|---|---|
Testfilename.csv | KT00970;KT01245;KT01244;KT00971 | Testfiletype | B001 |
myFile.rds | KT2002;KT1304 | rds-file | B002 |
results_final.csv | KT00980;KT00990 | Testfiletype | EXP-00001 |
Apply batchId to all files (alternative valid syntax for GUIDs and batchId)
If all files in your manifest belong to the same batch, you can supply a single batchId value in the header rows alongside accountGuid and projectGuid. This example also shows an alternative valid syntax in which the GUIDs and batchId appear as header-row key-value pairs rather than inline column values.
accountGuid | 16309200-3228-46eb-9a8e-3a4133f4d723 | NA |
projectGuid | e206cf7a-5b13-478f-b842-a305fe4954d8 | NA |
batchId | B001 | NA |
file | samples | fileType |
population-stats.csv | KT00970;KT01245;KT01244;KT00971 | FlowCytometry |
myFile.rds | KT2002;KT1304 | rds-file |
Nested folder structure (files nested in subdirectories must use the full path)
If your tar file contains files organized in subdirectories, use the full relative path for each file in the file column. This ensures HISE can locate each file correctly during ingestion.
accountGuid | 16309200-3228-46eb-9a8e-3a4133f4d723 | NA | NA |
projectGuid | e206cf7a-5b13-478f-b842-a305fe4954d8 | NA | NA |
file | samples | fileType | batchId |
subfolder1/Testfilename.csv | KT00970;KT01245 | Testfiletype | B001 |
subfolder1/myFile.rds | KT2002;KT1304 | rds-file | B001 |
subfolder2/results_final.csv | KT00980 | Testfiletype | B002 |
 Create the tar file
To create a new directory for your manifest file and samples, enter the following command in your terminal. (In this example, the directory is called
myTar. Use a name that makes sense for your project.)mkdir myTarDrag and drop the
manifest.csvfile and your sample files into the directory folder you just created.When you create a tar file, data can be accidentally overwritten. To save your data for safekeeping, copy the directory folder to another location before you proceed.
To create the tar file and prevent duplicate metadata, enter the following command. (In this example, the tar file is called
myProjectFiles.tar. Use a name that makes sense for your project.)COPYFILE_DISABLE=1 tar cvf myProjectFiles.tar myTar/.
 Ingest the tar file
In the upper-right corner in HISE, click your email address. Then, from the drop-down menu, select Environment.
On the Configure HISE Environment screen, select the Accounts tab, and click the drop-down menu next to Available Accounts. From the list, choose the account you want to work with.
In the Available Projects section, select the checkbox next to each project you want to work with. (To select or deselect all available projects, click the checkbox to the left of the table column headers.)
In the upper-right corner, click your email address, choose Watch Folders, and select the watchfolder for your account and project.
The watchfolder opens. Click UPLOAD FILES, or drag and drop your files into the watchfolder.
To see the status of your uploaded files, from the top navigation menu, choose Data Processing > Ingest Receipts.
a. ADismisserror means that the file Regex is incorrectly formatted. For details, see Use Watchfolders to Ingest Data.
b. AFailerror indicates some other problem uploading the file. Try again, and if the issue persists, contact Support to open a ticket.