Last modified 2026-02-19 |
Create an IDE Stack (Tutorial)
 | Abbreviations Key | |||||
| HISE | Human Immune System Explorer | v | version | |||
| IDE | integrated development environment | YYYY-MM-DD | year-month-day | |||
| PR | pull request |
At a Glance
IDE stacking means visibly and functionally linking a set of IDEs for a specific project or other purpose. A stack is like a digital deck of cards, with related IDEs nested together in an expandable row. Stacks inherit and preserve IDE provenance, keeping your work transparent and reproducible. They also decluttter the Collaboration Space, making it easier for contributors to work together efficiently. This document shows you how to do the following:
- Autostack a Set of IDEs
- Manually Create and Populate a Stack
- Expand or Collapse a Stack
- Manage a Stack
- Edit IDE Details
- Clone Instance
- Move to Different Stack
- Set as Top of Stack
- Remove from Stack
- Dissolve the Entire Stack
- Delete IDE Instance
If you have questions or need help, contact Support.
When to Use This Feature
Stacking your IDEs is useful when you want to do any of the following:
- Associate new environments or objects with the original, the way PRs are stacked sequentially in GitHub.
- Edit the entire stack, so that downstream environments or objects inherit or reference changes from upstream ones.
- Track permissions and control the IDE lifecycle by designating when instances are versioned or deleted.
Instructions
 Autostack a set of IDEs
1. Use your organizational email address to sign in to HISE.
2. From the top navigation menu, click RESEARCH, and then choose IDEs.
3. Create and open an IDE. For details, see Create Your First HISE IDE (Tutorial).
4. To associate your files and the IDE itself with your study, use upload_files(). For details, see Use the Upload Files SDK Method (Tutorial). To autostack, the IDEs must follow the naming conventions outlined in the box below. (Note: IDEs whose names have been manually changed cannot autostack.)
| AUTOSTACK NAMING CONVENTIONS | ||||
| Format | Examples | Comments | ||
| By Version | [IDE Name]+[v]+[number] |
|
| |
| By Date | [ |
|
| |
5. To view your autostacked IDEs, go to Collaboration Space > Studies > [Your Study] > IDE Instances.
 Manually create and populate a stack
1. Use your organizational email address to sign in to HISE.
2. From the top navigation menu, choose Collaboration Space.

3. In the Your Studies section, click the card that represents the study whose IDEs you want to stack.

4. From the side navigation panel, choose IDE Instances.
5. In the upper-right corner is a CREATE STACK button. This option is visible only if more than one IDE instance is associated with the selected study.
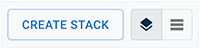
A. To the right of the button is a stack icon (left) and a hamburger icon (right). The stacked view is the default. To toggle back to the table (unstacked) view of your IDE, click the hamburger icon.
B. To create a new stack, click CREATE STACK.
Alternatively, if no stacks exist, click the ellipsis next to any IDE.
|


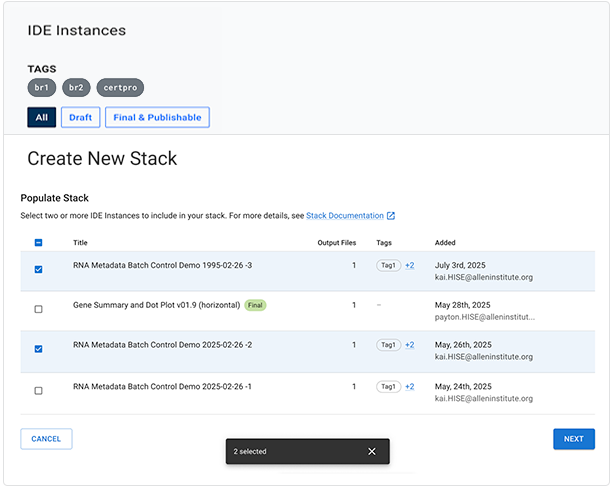
C. On the Populate Stack screen, select the checkboxes next to the IDEs you want to include in your stack, and click NEXT.
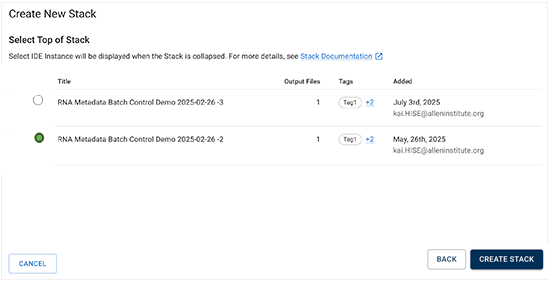
D. Click the radio button next to the IDE you want to appear at the top of the stack, and click CREATE STACK.
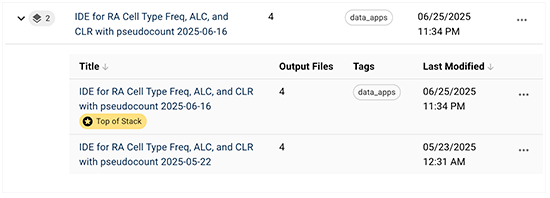
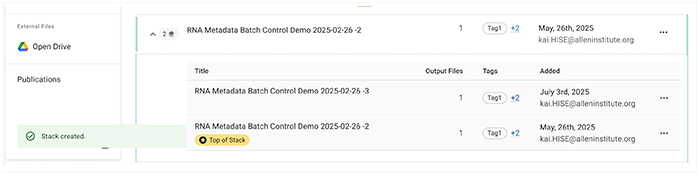
The new stack appears, with the selected card marked as the top of the stack.
 Expand or collapse a stack
1. Create and populate a stack (see Step 1). The number of IDEs appears next to the stack. To show all IDEs in the stack, click the down arrow.

The stack expands.
2. To collapse and hide the IDEs in the stack, click the up arrow.

 Manage a stack
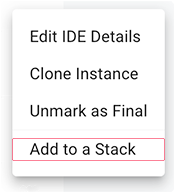
To edit, copy (clone), move, or delete instances from a stack, click the ellipsis next to the IDE you want to change.

 Edit IDE Details
Update IDE details or links to ensure that the stack trace accurately reflects current relationships and data location.
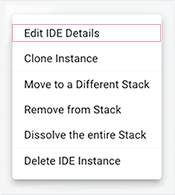
1. Click Edit IDE Details.
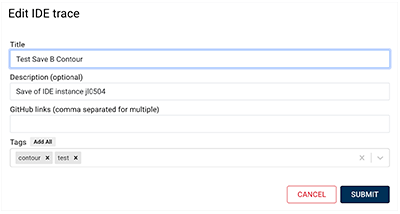
A. In the Title field, edit the title of the IDE.
B. In the Description field, enter meaningful details about the IDE or the project it's associated with.
C. In the GitHub links field, enter a link associated with the IDE, as in the following example.
https://github.com/AllenInstitute/AllenInstituteTaxonomy
D. In the Tags field, to add a new tag, type into the field. To delete a tag, click the re X next to it.

2. Click Submit.

Clone Instance
Duplicate an IDE to experiment or run a new analysis.
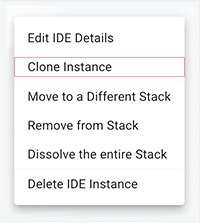
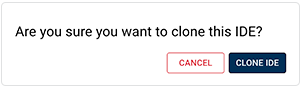
1. Click Clone Instance.
2. In the confirmation box, click Clone IDE.
Move to a Different Stack
The option you see here depends on where the IDE is in the stack. If it's at the top of the stack you see Move to Different Stack. If it's not at the top of the stack you see Move to Top of Stack.
1. To move a top-level IDE, click Move to a Different Stack.
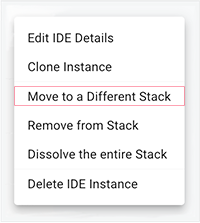
2. Click the radio button next to the stack to which you want to move the asset. (There might be only one choice.) Then click ADD TO STACK.
Set as Top of Stack
2. Alternatively, to move a secondary-level IDE to the top, click Set as Top of Stack.
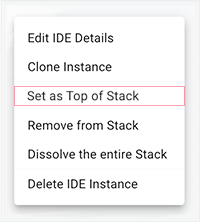
3. Click the radio button next to the stack you want to move the IDE to.
4. Click Add to Stack. The badge moves the the IDE you selected.

Remove from Stack
Remove the association between and among IDEs in the stack. In other words, unstack them so that each IDE operates independently, with a new, unique stack ID.
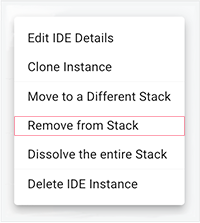
1. Click Remove from Stack. No confirmation is required.
Dissolve the Entire Stack
Break apart a stack so that the stack itself ceases to exist and the IDEs within it no longer share a stack ID. Individual IDEs, however, are preserved as standalone assets.
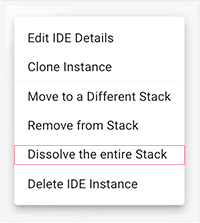
1. Click Dissolve the entire Stack. No confirmation is required.
Delete IDE Instance
Permanently delete the IDE stack. This action deletes one IDE at a time. It's not a bulk-delete process.
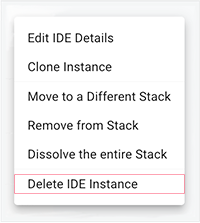
1. Click Delete IDE Instance.
2. To confirm this action, click DELETE.

 Related Resources