Last modified 2025-06-16 |
|
Start an AI/ML Training Run (Tutorial)
At a Glance
This document explains how to use the HISE SDK and a Python script to launch a remote, resource-configurable training job for an AI/ML model. Now you can use Pixi environments for AI/ML training runs, and your training images take less time to build and deploy,
NOTE
If you want Pixi to manage dependencies for your training run, use a Pixi IDE and don’t set requirements_file_path when calling start_training_run(). Setting requirements_file_path causes the build to use that requirements file instead of the Pixi environment.
These jobs consume significant resources. Before you begin, make sure you have approval from your manager or project lead to use this SDK, and confirm that you have a large enough quota to accommodate the necessary training runs.
Method Signature
hp.start_training_run(
    provider: str = 'ray',
    cpu_count: int = 1,
    gpu_count: int = 0,
    memory_size: int = 10,
    worker_count: int = 0,
    training_job_file_path: str,
    title: str,
    description: str,
    file_set_id: str,
    project: str,
    additional_dirs: list = [],
    additional_files: list = [],
    requirements_file_path: str = None,
    image_id: str = None,
    use_conda: bool = False,
    output_file_size: int = 5,
)
Parameters
Parameter | Data type | Required or optional | Default | Description |
|
| required | NA | Path to training job script |
|
| required | NA | Training job title |
|
| required | NA | Training job description |
|
| required | NA | File set ID used as the training job input |
|
| optional |
| Compute resource provider or backend for the training run |
|
| optional | 1 | Number of CPUs allocated to the training job |
|
| optional | 0 | Number of GPUs allocated to the training job |
|
| optional | 10 | Amount of memory (GB) allocated to the training job |
|
| optional | 0 | Number of worker nodes for distributed training |
|
| optional | Project selected on IDE creation | Short name of project that the Ray job cost will be billed under |
|
| optional |
| Additional directories your script requires |
|
| optional |
| Additional files your script requires |
|
| optional |
| Path to the |
|
| optional |
| Image ID (e.g., Docker) for the training job |
|
| optional |
| Indicator of whether to use Conda environment for training |
|
| optional |
| Estimated output file size (GB) |
 Get Help
If you get stuck during a start_training_run() call, refer to the steps of this tutorial. To use the baked-in help in your IDE, try one of the following commands. Still not working? Click Support to file a ticket.
Python | Output |
| Function signature, list of parameters, class, and a brief description of the method in a compact plain-text format |
| Method signature, docstring (description), file location, and file type in more readable format |
| Signature, docstring, file path, a verbose set of metadata, and the source code for the method |
Instructions
|
 Import libraries
To get started, set up your environment to interact with HISE programmatically and access all available SDK functions. For details, see Use Hise SDK Methods.
1. Navigate to HISE, and use your organizational email address to sign in.
2. Open an IDE. For instructions, see Create Your First HISE IDE (Tutorial).
3. Install the HISE SDK if you haven't already done so.
# Use pip to install the SDK!pip install hisepy
4. To import hisepy, enter the following code into a new cell in your IDE.
# Import the Python SDK to enable programmatic access to HISE functionsimport hisepy as hp
 Prepare your script
1. Prepare your script, as in the following example.
# Ray is a unified open-source framework for scaling AI and Python applications.
The time module provides various time-related functions.
The random module provides functions for generating pseudo-random numbers and performing random operations.

import ray
import time
import random

def compute_square(x):
time.sleep(random.uniform(0.5, 1.5)) # Simulate some delay
return x * x

def main():
inputs = list(range(10))

# Launch tasks in a list comprehension
results = [compute_square(x) for x in inputs]

# write some random output
with open("/home/workspace/output/empty.txt", "w") as f:
pass
print("Results:", results)

if __name__ == "__main__":
Note on Ray Integration The code transformation workflow has been updated so that your Transformed app.py for Ray Execution |
 Call start_training_run()
1. In a new cell in your IDE, call hp.start_training_run() with all required and optional parameters.
hp.start_training_run(
provider='ray',
cpu_count=1,
gpu_count=0,
memory_size=4,
worker_count=1,
training_job_file_path="/home/workspace/app.py",
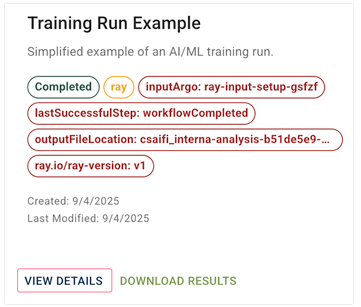
title="Training Run Example",
description="Simplified example of an AI/ML training run.",
file_set_id="60b4e815-85e6-4aaa-84c2-000b48f5fff5",
additional_dirs=[],
additional_files=[]
)A. If the run is successful, you receive a message similar to this one.
|
B. At the prompts, make any necessary changes to the decorators.
i. Answer the prompts. If you're not sure, choose 2) None.
|
ii. You receive a final success notification like this one.
|
C. If you encounter any issues, check the error message, and see the following Troubleshooting tips.
|
 Monitor your run
1. To watch your job start, view logs, iterate on your script, and track progress, go to RESEARCH > AI/ML > Training Runs, and click View Details. To see the most recent runs, sort by date. For details, see Review an AI/ML Training Run (Tutorial).
 Related Resources