
Work with Studies (Tutorial)
Last updated 2026-08-04At a Glance
A study is a shared project space for organizing research work in HISE. Teams can use studies to describe their work, group related assets, promote discoverability, and encourage reuse. This tutorial shows you how to use studies to support collaboration by clarifying roles, adding helpful context and assets, and making your research easier for others to find and explore.
When to Use This Feature
Use studies when you want a shared space to help collaborators organize research, understand context, and store files and related resources. Studies let you arrange work by research topic, add searchable metadata, and designate a well-delineated project or team collaboration space.
Instructions
Create a study
To create a study, describe the study and associate it with the project.
Navigate to HISE, and use your organizational email address to sign in.
From the top navigation menu, select Collaboration Space.
In the upper-right corner, select CREATE STUDY.
Complete the Create new study dialog box. To change the name, description, or tags after you create the study, see the Edit tab in this tutorial.
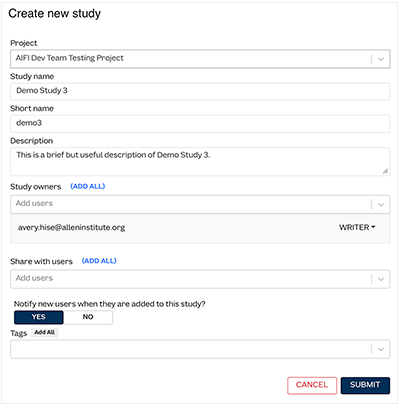
A. In the Project field, choose the billing group for your study. This selection determines which assets (such as IDEs and files) are visible to you and which Project Store you use to ingest data.
B. In the Study name field, enter a study name of 64 or fewer characters.
C. In the Short name field, enter a truncated name (16 or fewer characters) to be used as a prefix on your study's Google Drive folders. Use only lower-case letters, numbers, and hyphens (-), with no spaces.
D. In the Description field, give a brief but helpful description of your research for those who are unfamiliar with it. Include keywords likely to appear in a user's search.
E. (Optional) In the Study owners field, add one or more study co-owners or contributors.
If you add a new owner, use the YES/NO toggle selector to indicate whether the person is notified by email. For details, see the Change access tab in this tutorial.
F. In the Tags field, click the arrow to select from the available tags, or use the keyboard to enter a new tag.
G. Click SUBMIT.
View study details
In the HISE Collaboration Space, use the YOUR STUDIES and ALL STUDIES tabs to switch between studies you work on directly and those you can view in read‑only mode from across the account.
Choose which studies to view:
A. To view studies you own and those to which you contribute, remain on the default YOUR STUDIES tab.
B. To see all studies visible within your account, including those you don't own and to which you're not a contributor, click ALL STUDIES. You can open these studies in read‑only mode to see their details and assets, but you can't change or add assets to them unless you become a contributor.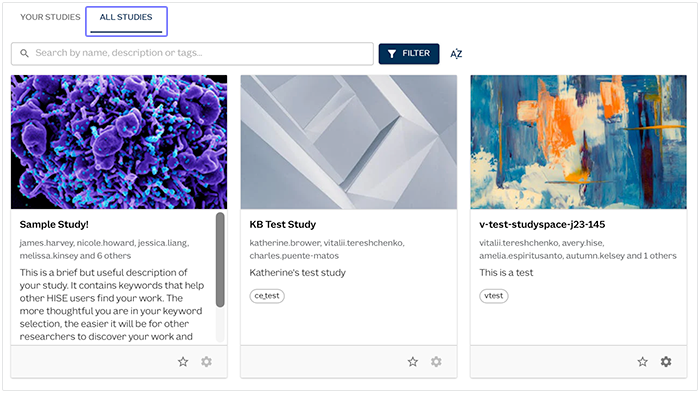
View study details
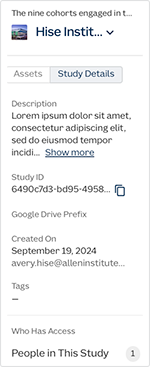
Click the card of the study whose details you want to see. For help finding a particular study, see the Filter & sort tab of this tutorial.
To expand the Description field, click Show more. To collapse it, click Show less.
To copy the Study ID, click the copy icon at right.
In the Google Drive Prefix field, view the prefix (if any) for this study.
In the Created On field, view the date created and the email address of the study owner.
In the Tags field, view the tags (if any). To expand the field to show all tags, click the +[number] icon, such as +2
In the Who Has Access field, click Collaborators to view a list of users and their roles. For a description of each role, see the accompanying Role Definitions table. To edit collaborators or change role permissions, see the Change access tab.
Role Definitions
Term | Description |
Owner | The owner is the study creator. This user is the only collaborator who has full admin privileges, including the ability to delete the study. The owners can also edit documents, manage users, create and manage reports, and manage files (including visualizations, file sets, and saved IDE instances). |
Co-Owner | A co-owner is another owner who is not the study creator but can nevertheless read, edit, add, or delete assets, including those in the Google Drive workspace. The only exception is that co-owners can't delete the study itself. |
Contributor | A contributor can read and comment on the study and can post study assets, but cannot edit or delete those assets. Options to add or remove study collaborators or change collaborator roles are visible only to the study owner, co-owners, and admins. Contributors can't modify roles. You can request a role change from the study owner or a co-owner, or contact Support to reach an administrator. |
Collaborators | Collective term for the owner, co-owners, and contributors. |
Search, filter, and sort
Use search to match text, filters to narrow the list, and column headings to sort the rows.
NOTE
Before you open the Filters panel, you can sort by the study cards themselves, either alphabetically or by last modified date, by clicking the AZ icon :
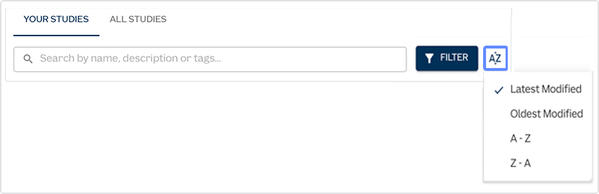
Filter studies
To open the Filters panel, click FILTER.
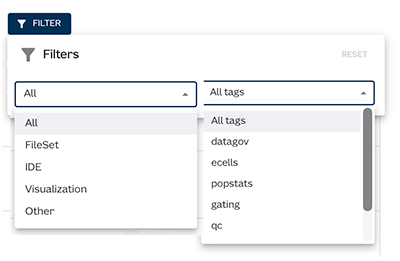
To filter by asset type, click the drop-down list at left and select FileSet, IDE, Visualization, or Other. Only files of that asset type appear in the results window.
To filter by tag, select a tag, such as
datagov. Only studies bearing the specified tag appear in the results window. (To combine filters with tags, see the last section on this tab.)To reset the Filters panel and return to the full list, click RESET in the upper-right corner.
Search for studies by keyword
In the Search box, enter a word or phrase, such as a study name, a keyword from the study description, or a tag name.

Review the updated list of studies that match your search terms.
If no results appear in YOUR STUDIES, switch to the ALL STUDIES tab to repeat the search across all visible studies, even those with which you're not associated.
Sort the study list
To sort by last modified date, click the Last Modified column heading. To reverse the sort order (for example, from ascending to descending), click the heading again.
To sort files by availability, click the Availability column heading. Doing so reorders the rows so that entries with the same availability value (such as
available,archived, or unspecified [blank]) appear together.To sort in alphabetical order by name, click the File column heading.
To sort by asset type, click the Associated Asset column heading.
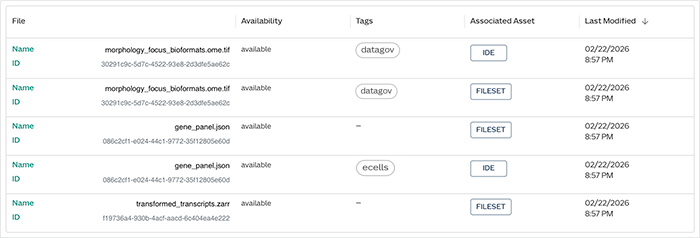
Combine filters, search, and sort
Apply one or more filters (tag =
datagov).Enter a keyword or phrase in the Search field to narrow the filtered list further.
Use the column headings (such as Last Modified or Available) to sort the remaining rows.
Mark your favorite studies
Favorite studies are stored per account, so you see only the favorites associated with the account you’re currently using. For details, see Switch Your Account or Projects (Tutorial). Favorites may depend on browser‑specific storage, so they might not persist if you switch browsers or machines.
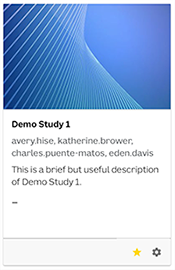
In the HISE navigation menu, click Collaboration Space. The Collaboration Space opens to the Favorite Studies page.
In the study list, find the study card(s) you want to keep handy, and click the star icon to mark each one as a favorite. The marked studies move to the Favorite Studies section so you can find and open them quickly next time.

To remove a study from your list of favorites, find the study in either the Favorite Studies section or the YOUR STUDIES list, and click the star icon to deselect it. The study disappears from the your Favorite Studies section but stays in the YOUR STUDIES list.
Edit study details
If you're a study owner, co-owner, or admin, you can update the study name, short name (prefix), description, hero image, collaborators, or tags, or change the project with which the study is associated.
NOTE
The Edit Study Details option is visible only to study owners, co-owners, and admins. You can request permission changes from the study owner, or contact Support to reach an administrator.
On the Study Details tab, click the thumbnail that represents your study.
In the left navigation panel, from the drop-down list, select Edit Study Details.

In the Edit Study Details dialog box, enter the details you want to change, and click UPDATE STUDY.
Add or change study access
In the HISE Collaboration Space, click the card of the study you want to edit.
In the left navigation panel, go to Study Details > Who Has Access > Collaborators.
A. To add a collaborator, click into Email field of the Add Users to the Study dialog box, and enter the email address of the person you want to add. Alternatively, select a name from the drop-down list of email addresses. If necessary, use the A–>Z search filter to sort your results.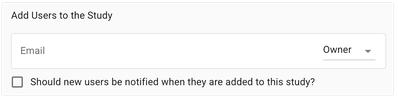
B. To change a collaborator's role, click the arrow next to the collaborator's email address, and choose a different role from the drop-down list.C. To notify the collaborator by email that they've been added to the study, click the checkbox.

Add or change study assets
From the top navigation menu in HISE, click Collaboration Space, and select the card that represents your study.
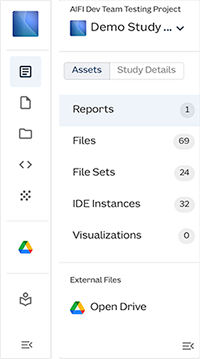
In the side navigation panel, choose the type of asset you want to add. For a description of each asset category, see the accompanying table.
Study Assets | ||
Asset | Description | |
Report | A report is a Google Doc, Sheet, or Slide, a Microsoft Word document, or a PowerPoint presentation saved to the team Google Drive. | |
Files | HISE supports various analysis pipelines that generate searchable output files. These files typically contain analysis results plus one or more reports. | |
File Sets | Result files of particular interest can be saved as file sets. These files sets can include reports, such as QC reports, or result files, such as labeled scRNA-seq files from an automated pipeline or files produced by an IDE. | |
IDE Instances | HISE's Jupyter Notebook environment lets you explore data and derive further insights using Python or R. You can upload the results to a study | |
Visualizations | You can use a subjects query or a samples query to save and visualize human metadata, or you can use a result files query to visualize the flow cytometry supervised gating pipeline. You can also create an IDE and use R or Python to generate Plotly graphs, or use Python to create a complex interactive visualization by building a Dash application. | |
Add a report
A. From the side navigation menu, click Reports > CREATE REPORT.
B. In the dialog box, enter the requested information.
C. Click SUBMIT. For details, see Prepare a Report (Tutorial).Add a file
A. From the side navigation menu, click Files.
B. Click Open Drive.
C. Click + New.
D. From the drop-down list, choose File upload. Browse your files, click the one you want to upload, and select Open. The file now appears in the Google Drive workspace for this study.E. Alternatively, use the
upload_files()|uploadFiles(R) SDK method to upload a file or files to your study. Then click Files in the HISE side navigation menu to see a list of the newly uploaded files and to access other views of the upload files workflow. For details, see Use the Upload Files SDK Method (Tutorial) and Produce Searchable Output Files.Add a file set
A. Click File Sets.
B. Click Open Drive.
C. Click + New.
D. From the drop-down list, choose Folder upload > Upload.
E. Browse your folders, click the one you want to upload, and select Open. The folder now appears in the Google Drive workspace for this study.
F. Alternatively, use theupload_files()SDK method to upload a file set to your study. Then click File Sets in the HISE side navigation menu, and the files appear in tabular format. For details, see Use the Upload Files SDK Method (Tutorial), Produce Searchable Output Files, and Work with File Sets (Tutorial).Add an IDE instance
A. In your IDE, use theupload_files()method to upload the output files to your study space. For details, see Use the Upload Files SDK Method (Tutorial).
B. In HISE, find the card that represents your study, and then select IDE Instances from the side navigation menu. If the IDE was successfully uploaded to your study space, it appears there, along with a list of other IDEs associated with the study (if any). For detailed instructions, see Attach an IDE to a Study (Tutorial).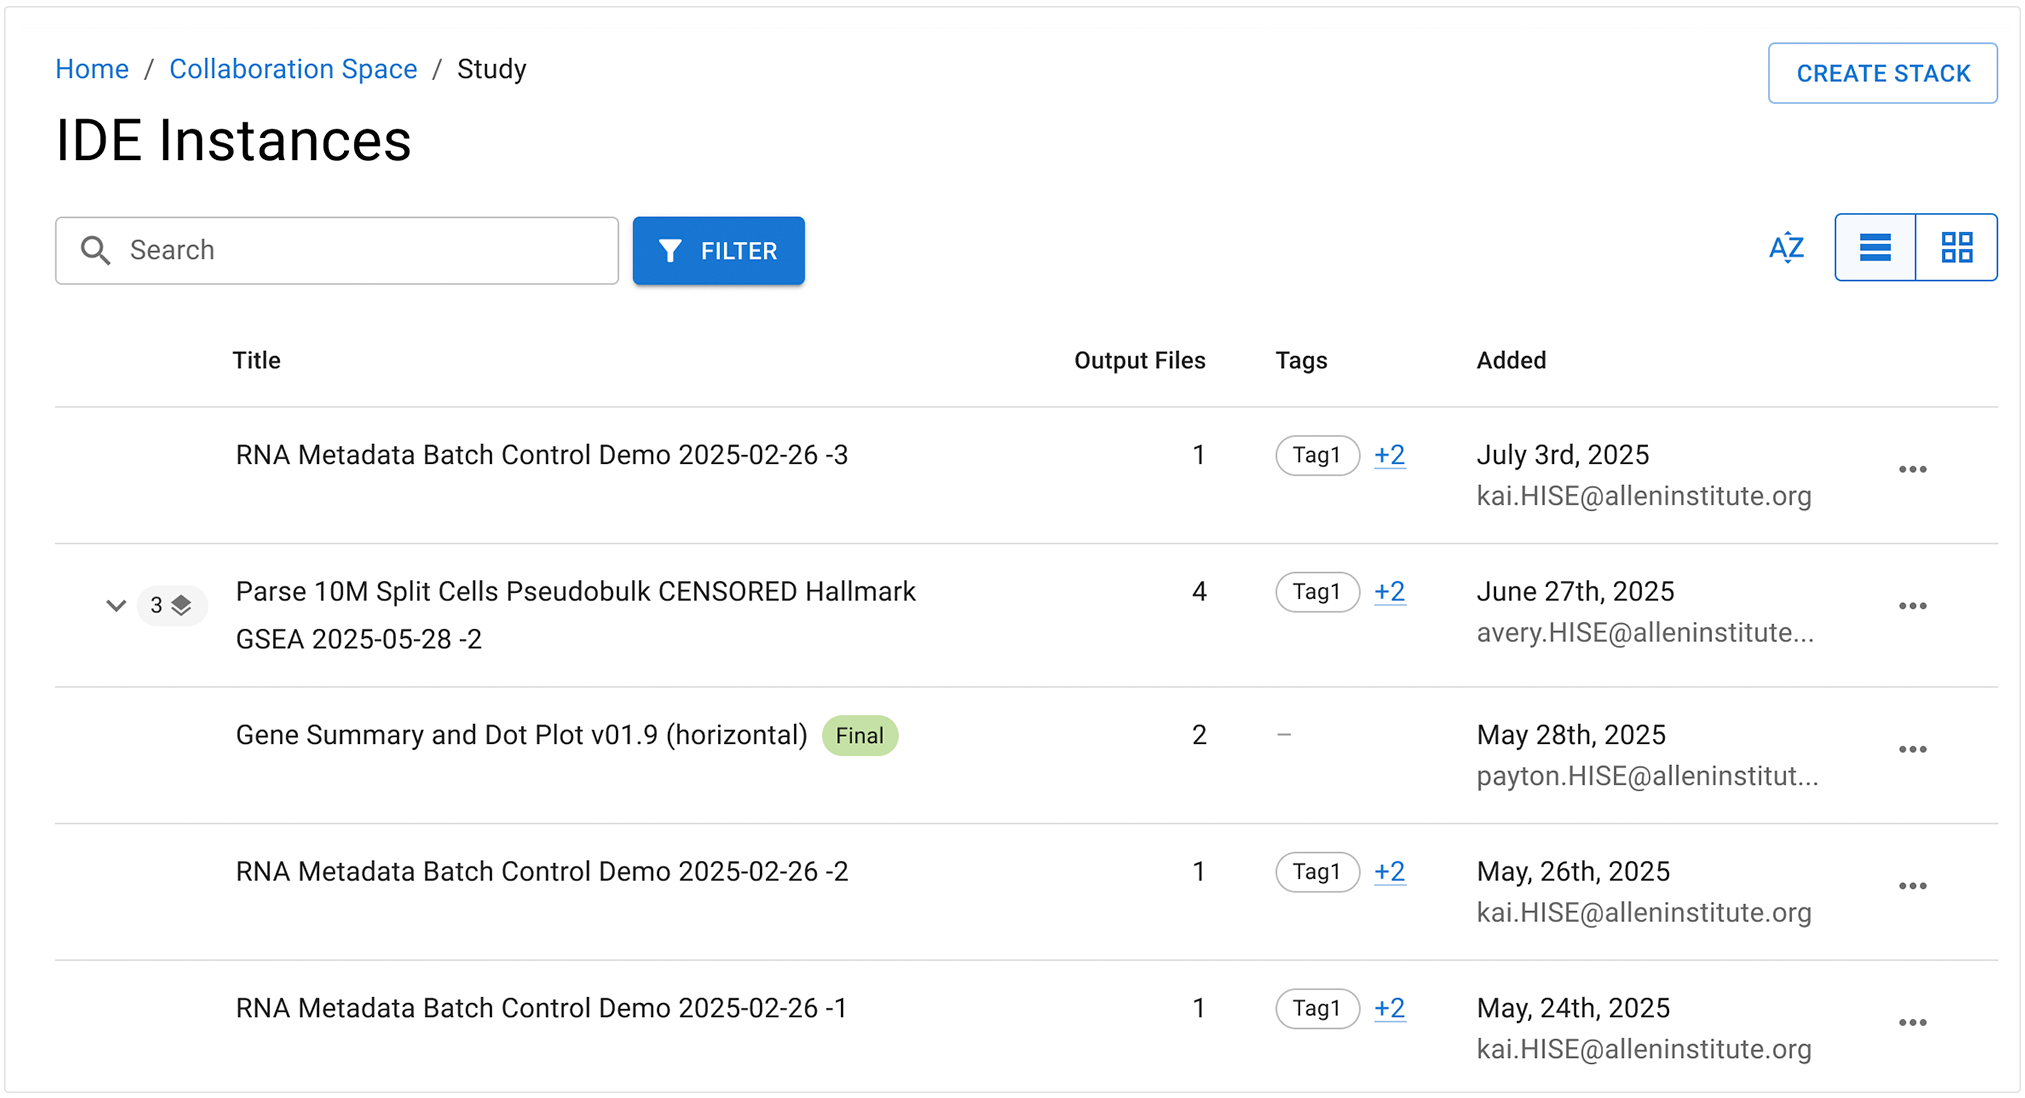
Add a visualization
A. From the side navigation menu, click Visualizations > Open Drive > + New > File upload.
E. Browse your files, and click the visualization you want to upload.
F. Select Open. If your file is large, a status message appears while your file is being uploaded. The uploaded visualization then appears in the Google Drive workspace for the selected study.
G. Alternatively, use thesave_abstraction()SDK method to save the visualization to your study. Then select Visualizations in the HISE side navigation menu, and the visualization appears there as a card. For details, see Use the HISE SDK to Create Visualizations (Tutorial).
Add a hero image
When a study is created, a generic hero image is randomly placed. If you're a study owner, you can upload an image that better reflects your research. Choose an image from the team drive, from a saved visualization, or from a public internet site, such as Wikimedia. (If you use an image from another site, save it to Google Drive for uploading.) Give proper credit to the artist or photographer as required by the open-access license agreement. Don't upload a copyrighted image to your study unless you have explicit written permission to do so, such as a permissions letter or license agreement.
In the HISE Collaboration Space, click the card that represents your study. Then, in the Study Details tab in the side navigation panel, select Edit Study Details. You then have the option to upload a hero image either from Google Drive or from a saved visualization.
To upload an image from the Google Drive workspace for this study, select CHOOSE FROM DRIVE.
A. To upload an image from the Google Drive tab, select CHOOSE FROM DRIVE.
B. Drag and drop your image file. Alternatively, click Select files from your device, and browse to find your image file.
C. Click Upload.To use a thumbnail from a visualization, select CHOOSE FROM VISUALIZATIONS.
A. In the Visualizations dialog box, click the PNG image you want to use. Note that duplicates might appear.
B. Click Select. The new image then appears as the hero image on the study card in the Collaboration Space.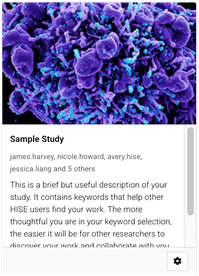
Delete a study
In the HISE Collaboration Space, click the card that represents your study.
On the Study Details tab in the side navigation panel, click the thumbnail that represents your study. and select Delete Study.
NOTE
If you don't see the Delete Study option, check to see if you're the study owner. Only the owner can delete a study. In addition, the study must have no assets associated with it, and the study's Google Drive space must be empty. For help, contact Support.
Related Resources
Attach an IDE to a Study (Tutorial)
Save Input Files or File Sets to a Study (Tutorial)
Support