
Use Ray Parallelization for Custom Training Runs (Tutorial)
Last updated 2026-08-05At a Glance
This tutorial shows you how to use Ray, an open-source framework for scaling AI and Python applications, to run multiple functions in parallel and accelerate your AI/ML workflow. Ray is already available in HISE IDEs, so you can use this tutorial as a quick-start template before adapting the sample code to your own resource-intensive tasks.
When to Use This Feature
Ray is well suited to performing independent, repeatable units of work, from hyperparameter tuning and distributed model training to large-scale data processing and simulation. Ray distributes repeated calls across available CPUs, GPUs, or cluster nodes so they run concurrently instead of sequentially, reducing completion time from days to hours.
Why Parallelize?
Ray runs ordinary Python functions as asynchronous, distributed tasks, handles failure recovery, and scales resources as demand changes. Ray calls several functions in a list comprehension, as this tutorial does with compute_square(), fanning them out and running them concurrently.
Longitudinal, multiomic research routinely generates large cohorts of samples that are ideal candidates for parallelization because they require identical processing steps that must be applied independently:
Processing large single-cell RNA-seq or flow cytometry datasets sample by sample
Hyperparameter tuning or cross-validation sweeps for classification or clustering models, in which each parameter combination or fold is an independent run
Batch inference or feature extraction across many donors, timepoints, or cell populations, such as scoring every subject in a cohort against a trained model
Simulation or bootstrapping analyses that repeat the same statistical procedure many times with different random inputs
Ray lets you write the logic once and turn the task over to the platform to run it at scale, rather than writing your own multiprocessing or job-scheduling code from scratch.
NOTE
Don’t use Ray to perform a single computation, to process a small dataset that already runs in seconds, or to execute code that's inherently sequential (in which each step depends on the output of the previous step). In those cases, the overhead of distributing the work outweighs any benefit.
Instructions
Use these steps when you want to parallelize a simple custom script and connect it to start_training_run() from a notebook.
Import libraries and modules
The only required library is Ray. The time module provides various time-related functions. The random module provides functions for generating pseudo-random numbers and performing random operations. All other packages are based on the needs of your custom script.
You don't need to import hisepy in this notebook because this tutorial only uses Ray to parallelize local code. In Step 5, you do import hisepy in a separate notebook used to start the training run.
Import the necessary libraries.
import ray
import time
import random
Define the compute-intensive function
Define the compute-intensive methods that use Ray drivers to run in parralel for various inputs:
def compute_square(x):
    time.sleep(random.uniform(0.5, 1.5))  # Simulate some delay
    return x * x
Define the script entry point
To execute the script in parallel using
hisepy.start_training_run(), callcompute_square()10 times within a list comprehension.
def main():
    inputs = list(range(10))

    # Launch tasks in a list comprehension
    results = [compute_square(x) for x in inputs]

    print("Results:", results)
Run the main workflow
To verify that the main workflow executes without errors, run the following cell:
def main():
    inputs = list(range(10))

    # Launch tasks in a list comprehension
    results = [compute_square(x) for x in inputs]

    print("Results:", results)
Results: [0, 1, 4, 9, 16, 25, 36, 49, 64, 81]Call start_training_run()
Use the SDK to download your files initially. After that, your training job code shouldn't reference any SDK method.
Before you call
start_training_run(), find the file set ID for your project:A. In HISE, go to Collaboration Space.
B. On the Your Studies page, click the card that represents your study.
C. In the left navigation menu, click File Sets.
D. Find your file set, click it, and copy theFileSetID: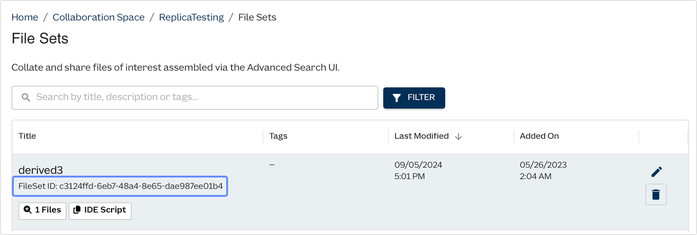
From a different notebook or from the terminal, import
hisepyand call thehp.start_training_run()SDK method. (For details, see Start an AI/ML Training Run (Tutorial). The SDK will automatically transform your Python script and apply any adjustments necessary to run it with Ray.To preview how Ray will run your script, call
hp.transform_to_ray(), and pass in the script path, as in the following example:hp.transform_to_ray('/home/workspace/task_example.py')
Example
Use this example when you’re ready to try a realistic HISE workflow that applies Ray to spatial transcriptomics data and helper modules.
Import libraries and helper modules
Import the necessary libraries.
import anndata as ad
import squidpy as sq
import scanpy
import cellcharter as cc
import pandas as pd
import scvi
import numpy as np
import matplotlib.pyplot as plt
from lightning.pytorch import seed_everything
import os
import gc
import ray
from ray import tune, train
from datetime import datetime
import argparse
import json
import torch
import seaborn as sns
from sklearn.model_selection import train_test_split
from scipy.sparse import csr_matrix
Import custom modules into your notebook. In this example, we use several helper modules (Python files in
./helpers) containing functions that are not compute intensive. These functions don't require Ray for optimization and should therefore be defined outside of this notebook.
import task_helpers.arg_parser as hap
import task_helpers.data as hd
import task_helpers.train as ht
import task_helpers.tune_model as htm
Define the compute-intensive Ray functions
Define the compute-intensive custom functions that require Ray for parallel execution across various input data sets.
# ==================================
# Configure reproducibility settings
# ==================================
seed_everything(12345)
scvi._settings.seed = 12345

# =========================================
# Define a Ray-compatible training function
# =========================================
def train_scvi_with_ray(config, adata_ref_sp, train_idx, val_idx, test_idx, return_model=False):
    """
    Train an scVI model with a given configuration and data split.

    Args:
        config (dict): A dictionary of Ray Tune hyperparameters
        adata_ref_sp (AnnData): Annotated reference data set
        train_idx, val_idx, test_idx (np.ndarray): Index arrays for the data split
        return_model (bool): Indicator of whether to return the model for further training

    Returns:
        If return_model is True, an SCVI model object is returned.
    """
    scvi.model.SCVI.setup_anndata(adata_ref_sp, layer="counts", batch_key='sample')

    model = scvi.model.SCVI(
        adata_ref_sp,
        n_layers=config["n_layers"],
        n_latent=config["n_latent"],
        n_hidden=config["n_hidden"],
        dropout_rate=config["dropout_rate"],
        dispersion="gene",
        gene_likelihood=config["gene_likelihood"]
    )

    model.train(
        early_stopping=True,
        enable_progress_bar=False,
        max_epochs=config.get("max_epochs", 1000),
        batch_size=config["batch_size"],
        plan_kwargs={
            "lr": config["lr"],
            "n_epochs_kl_warmup": config.get("n_epochs_kl_warmup", 400),
            "reduce_lr_on_plateau": True
        },
        datasplitter_kwargs={
            "external_indexing": [train_idx, val_idx, test_idx]
        },
        check_val_every_n_epoch=1
    )

    # Report the validation ELBO
    val_loss = np.array(model.history["elbo_validation"].values, dtype=float).flatten()
    if return_model:
        return model
    else:
        train.report({"val_elbo": val_loss[-1]})
Define the main() function
Define the main function, which does the following:
Loads a spatial transcriptomics data set (AnnData)
Performs a stratified train/val/test split
Defines the search space and uses Ray Tune to optimize scVI training hyperparameters (batch size, in this case)
Retrains (if necessary) and saves the best model
Extracts the latent embedding from that model
In the following code block, we define a function called train_scvi_with_ray(). To enable parallel execution, Ray decorators are applied only to this function when the notebook is submitted using hp.start_training_run(). The SDK's RayTransformer class then updates the main() function, inserting ray.get and ray.remote where needed. These decorators support distributed execution of the compute-intensive functions defined in Step 2.
def main():

    # ==============================================
    # 1. Load spatial transcriptomics input data set
    # ==============================================
    adata_ref_sp = hd.load_data()
    print('data loaded')

    # ================================
    # 2. Train/validate/test the split
    # ================================
    print("training test split data..")
    train_idx, test_idx, val_idx = ht.train_and_split(adata_ref_sp)

    # ===============================================
    # 3. Optimize training hyperparams with Ray Tune
    # ===============================================

    # Define the search space
    print("parsing args")
    search_space = hap.parse_args()

    # Evaluate the best training model
    print("running model...")
    best_trial = htm.optimize_hyperparameters(train_scvi_with_ray, adata_ref_sp, train_idx, val_idx, test_idx, search_space)

    # ====================================
    # 4. Retrain and save the final model
    # ====================================

    # Retrain the final model
    print("retraining final model...")
    model = train_scvi_with_ray(best_trial.config, adata_ref_sp, train_idx, val_idx, test_idx, return_model=True)

    # Save the model
    print("saving model...")
    # NOTE: output path must be within /home/workspace/output in order for the data to be saved correctly
    dir_path = "/home/workspace/output/best_scvi_model"
    os.makedirs(dir_path, exist_ok=True)
    model.save(dir_path, overwrite=True)

    # ================================
    # 5. Extract the latent embedding
    # ================================
    model = scvi.model.SCVI.load(dir_path, adata=adata_ref_sp)
    adata_ref_sp.obsm['X_scVI'] = model.get_latent_representation(adata_ref_sp).astype(np.float32)
Add the main guard
To ensure that certain code blocks execute only when the file is run as a script, define a
__main__guard. For example, if this notebook were saved as a.pyscript, you could run it in the terminal by executingpython task_example.py. Run the following cell to verify that the main workflow executes without errors.
if __name__ == "__main__":
    main()
Submit and preview the training run
Before you call
start_training_run(), find your file set ID. For details, see Step 5 of the instructions (you are now in Step 5 of the example).To preview how Ray will run your script, call
hp.transform_to_ray(), and pass in the script path, as in the following example:hp.transform_to_ray('/home/workspace/task_example.py')